Installing Windows 10 Preview
Windows 10 preview has been around for a while now, but I’ve been testing it only since Saturday. At first look it seems that this is just a minor UI change, but when you start playing with it, you’ll see lots of interesting features that Microsoft introduced to make Windows easier to use across all platforms.
A following blog posts will now follow to deep dive into the features of Windows 10 preview. The post below shows where to download the software and how to install it in a VM.
Where to Download Windows 10?
You can download it free through the Windows Insider Program
Follow these steps to download Technical Preview:
- Sign up for the Windows Insider Program, if you haven’t already.
- Read the system requirements.
- Click one of the Download links on this page to download a special file—it’s called an ISO file—that you can use to install the preview.
- When the download is complete, transfer the ISO file to installation media such as a USB flash drive or DVD.
- Double-tap or double-click setup.exe from the installation media, and then follow the steps.
What are the minimum requirements to install Windows 10 Preview?
- Processor: 1 gigahertz (GHz) or faster
- RAM: 1 gigabyte (GB) (32-bit) or 2 GB (64-bit)
- Free hard disk space: 16 GB
- Graphics card: Microsoft DirectX 9 graphics device with WDDM driver
- A Microsoft account and Internet access
How to Install Windows 10 Preview in a VM?
Since I have 1 main PC at home, I’ve been testing it in a VM.
I find the easiest and quickest tool to use is Virtual Box. You can download it for free here, then follow the steps below:
1. Install Virtual Box
2. Mount the Windows 10 image on your local machine.
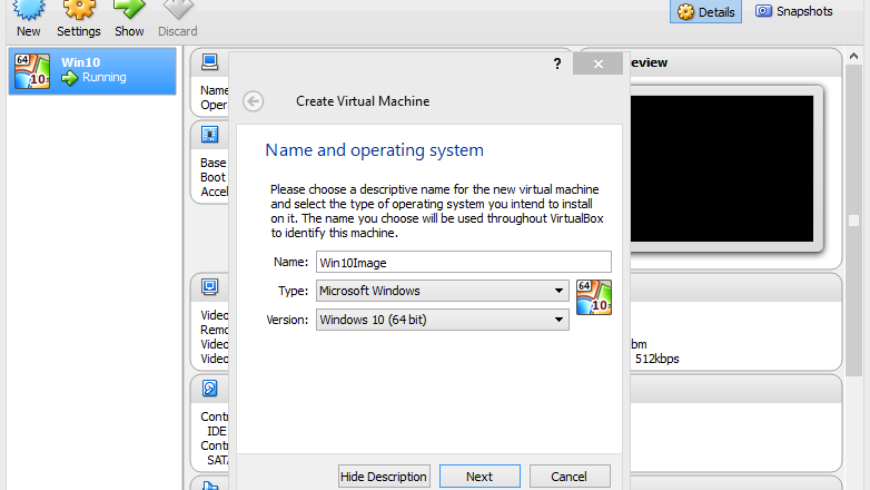
3. Open Virtual Box and click on New, select the version of Windows and a name for the image.
4. Set the amount of RAM to allocate to the VM
5. Determine whether to create a Virtual Hard Drive or not.
6. Set the file type of the hard drive
7. Set whether the had drive space shall be allocated dynamical or it shall be fixed.
9. Set the maximum storage space of the Hard Drive.
10. Select the image and click on start.
11. You may run into a fatal error saying that no bootable media has been detected. Click on devices and select the drive where you mounted the image. And start the VM again.
From here follow the steps for a normal installation.


