Scope
The following article introduces the concept of bots, demonstrates the basics of the Microsoft Bot framework and showcase how to build your first bot using the Bot Framework and C#.
Introduction
Conversational Applications or bots is a hot topic right now, is it really useful or it’s just a hype? To answer this question, let’s look at scenarios where a bots are useful. Messaging Applications.
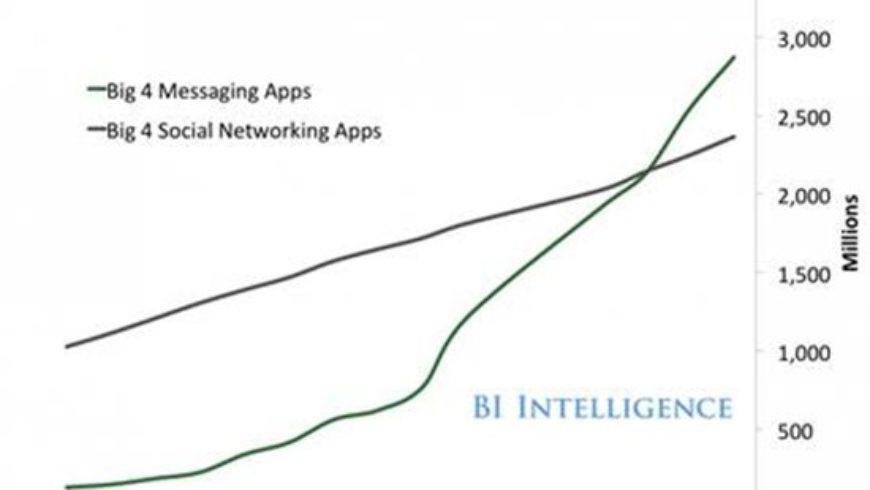
According to Business Insider, text Messaging is the most used smartphone feature and for the first time in history, people are using more messaging apps than social networks.
What if you could interact with your application via this interface? It is possible via bots! Moreover, bots can adapt and work on most devices and platforms like desktop, mobile, or social media like Facebook, WhatsApp or Skype. This will give your app a totally new selling point by interacting with your user using his favorite communication method and using his favorite platform!
Automating Repetitive Tasks
In scenarios where there’s repetitive tasks such as a call center, bots can easily be used since there’s lots of ‘generic’ answers. The flow as described below would be to handle the generic and most common requests and when there’s a more difficult query, the bot transfers the call to a human.
Getting Started
One of the tools to quickly build bots is the Microsoft Bot Framework. It is an Open source Bot Builder SDK which allows you to build simple to sophisticated dialogs; Cognitive Services enable your bot to see, hear, interpret and interact in more human ways. To get started with the Microsoft Bot Framework, you must first download the Bot Builder SDK here  .
.
Create the project
Follow steps below to set up the bot framework connector SDK .NET template in the Visual Studio 2015.
1. Install Visual Studio 2015 (latest version)
2. Download bot application template from this download link here
3. Save the zip file to your Visual Studio 2015 templates directory which is traditionally in “%USERPROFILE%DocumentsVisual Studio 2015TemplatesProjectTemplatesVisual C#”. For example, “C:UsersUSERXXDocumentsVisual Studio 2015TemplatesProjectTemplatesVisual C#”
In the Web.Config file, make sure the keys are as follows for debugging and run the project. These will need to be changed when deploying the bot.
<appSettings>
<!– update these with your BotId, Microsoft App Id and your Microsoft App Password–>
<add key=”BotId” value=”YourBotId” />
<add key=”MicrosoftAppId” value=”” />
<add key=”MicrosoftAppPassword” value=”” />
</appSettings>
Download & Configure the Bot Emulator
Download the emulator
here 
. Once the emulator is installed, copy the link of the running application in your browser and paste it in the emulator, leave the ID and Password blank and click on connect. The URL in the emulator must be in the format http://xxx:port/api/messages

Once you click on connect, when you check the Log, it should return status 200, meaning that the connection has been established.

Microsoft Bot Framework Basics
Let’s go back to the Bot Framework project to examine the code. The class here is the MessageController, this is where all the communication between the bot and the user will be handled.

All the input received from the user will go through the Post method where the type of the activity will be identified which will decide how to reply the user.
The main types of Activity are:
1. Message – A simple communication between a user <-> bot2. ConversationUpdate – Your bot was added to a conversation or other conversation metadata changed
3. ContactRelationUpdate – The bot was added to or removed from a user’s contact list
4. Typing – The user or bot on the other end of the conversation is typing
5. Ping – An activity sent to test the security of a bot.
6. DeleteUserData – A user has requested for the bot to delete any profile / user data
Therefore, in the post method, you will check the ActivityType. If it is of type message, the bot will send a reply to the user and output the length of the text that he sent.
if (activity.Type == ActivityTypes.Message)
{
//default
var connector = new ConnectorClient(new Uri(activity.ServiceUrl));
var reply = activity.CreateReply();
reply.Text = “You typed ” + activity.Text;
await connector.Conversations.ReplyToActivityAsync(reply);
}
Let’s amend the code to send a welcome message to the user when he joins the conversation and triggers aConversationUpdate activity.
else if (message.Type == ActivityTypes.ConversationUpdate)
{
var connector = new ConnectorClient(new Uri(message.ServiceUrl));
var response = message.CreateReply();
response.Text = “Hi there! I’m chervine’s bot! How can I help you today? “;
await connector.Conversations.ReplyToActivityAsync(response);
}
Now, let’s run the code and see the results in the emulator.
As expected, when a user joins the conversation, the bot sends a welcome message and when the user sends a message, the bots replies with the number of characters in the input message.
Conclusion
The article demonstrated how to get started with Bot Framework and how to build your first bot. In the next article, the use of LUIS to add language understanding capability to the bot will be demonstrated.
References
- Bot Framework – Activities

- Messaging Apps are now bigger than Social Network – Business Insider


